We grow our own rhubarb. Last year I kept leaving it thinking it would grown more and it ended up rotting. This year to encourage more growth I have decided to cut of stems when they have reached a reasonable size.
I asked Mr M what he would like me to do with the rhubarb and he said he really wanted a crumble. As there wasn't that much rhubarb I decided to make 2 small individual crumbles for us.
Below is the recipe I use for a normal size crumble for these small ones I halved the amount of everything
Preheat the oven to 180degrees
Measure 8oz flour, 3oz butter and 4 teaspoons of sweetner/5oz sugar (Mr M is type 1 diabetic so I try not to use sugar)
Mix these in a bowl. Rub the mixture between your fingers to get the best crumbly effect
Cut the rhubarb into small cubes and put in a pan.
Use a dessert spoon to put about 5 spoonfuls of water into the pan. You aren't boiling the rhubarb but adding enough water to help it soften. I keep some in a cup beside me as I cook incase I need to add more
Put the rhubarb mix in your bowl/ramekins
Put your crumble mix on top of the rhubarb
Place in the oven for 30 minutes
Put in a bowl with cream/ice cream/custard
Yum Yum!!
Showing posts with label baking. Show all posts
Wednesday, 9 April 2014
Tuesday, 1 April 2014
Mummy Baking - Banana Loaf
I love baking!! I'm no Mary Berry but I do enjoy it. I have to be careful what I bake though with Mr M being a Type 1 diabetic I like to make sure he can enjoy what I bake too. I use Splenda instead of sugar when baking to make it more diabetic friendly.
One of our favourite bakes is Banana Loaf.
Mr M won't eat banana's once the skin has bruises on it (he thinks the banana is off - no matter how many times I tell him they are still quite edible!!)
You need butter (or vitalite in our house as I am lactose intolerant and it's dairy free), 2 eggs, self raising flour, Splenda (or sugar), 2 bananas, a loaf tin, scales and mixing bowls.
Pre heat your oven to 180 degrees.
Butter/margarine the inside of your loaf tin
Put 7 teaspoons of Splenda in a bowl (or 175g sugar)
Add 125g butter/margarine to the bowl
Mix this together. Add your 2 eggs
I whisk the eggs into the mix but you can use a wooden spoon
Measure out 250g self raising flour and gradually add this to the mix, stirring as you go (with a wooden spoon)
Once all the flour is added and mixed in, mash up your 2 bananas and add them to the mix
Stir in the bananas
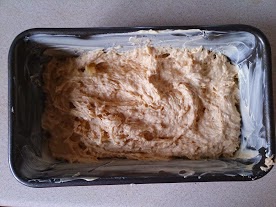
Place your mix in your loaf tin
Place in the oven for 45 minutes. Check with a skewer that the loaf is cooked through. Turn out onto a cooling rack (or in my case a shelf of my oven with kitchen roll on it)
Once cooled cut and enjoy :)
A really tasty recipe!
One of our favourite bakes is Banana Loaf.
Mr M won't eat banana's once the skin has bruises on it (he thinks the banana is off - no matter how many times I tell him they are still quite edible!!)
You need butter (or vitalite in our house as I am lactose intolerant and it's dairy free), 2 eggs, self raising flour, Splenda (or sugar), 2 bananas, a loaf tin, scales and mixing bowls.
Pre heat your oven to 180 degrees.
Butter/margarine the inside of your loaf tin
Put 7 teaspoons of Splenda in a bowl (or 175g sugar)
Add 125g butter/margarine to the bowl
Mix this together. Add your 2 eggs
I whisk the eggs into the mix but you can use a wooden spoon
Measure out 250g self raising flour and gradually add this to the mix, stirring as you go (with a wooden spoon)
Once all the flour is added and mixed in, mash up your 2 bananas and add them to the mix
Stir in the bananas
Place your mix in your loaf tin
Place in the oven for 45 minutes. Check with a skewer that the loaf is cooked through. Turn out onto a cooling rack (or in my case a shelf of my oven with kitchen roll on it)
Once cooled cut and enjoy :)
A really tasty recipe!
Thursday, 28 November 2013
Homemade Fudge
As I have been looking for something new to feed my sweet cravings I decided to have a look and see what I could make at home. Buying lots of chocolate is costly! I stumbled across a recipe for peanut butter fudge, sounds delicious!!!
For the recipe you need icing sugar, butter, peanut butter (I went for smooth but it doesn't specify so up to you if you want crunchy fudge) and vanilla. I forgot the vanilla when I went to the shop, so made the fudge without it.
Measure out 225g butter - this is nearly a whole block, use what you have left to grease your tray. Next measure 200g peanut butter. Place the butter and peanut butter in a bowl and put in microwave on high for 2 minutes. Whilst this is melting measure 450g icing sugar. After the 2 minutes stir your butter/peanut butter mixture then put in microwave on high for another 2 minutes.
Add your peanut butter/butter mixture (and vanilla) to the icing sugar and stir well with a wooden spoon. Once it's stirred in (I had to get Mr M to help with that part as I'm a wimp and couldn't stir it well enough) place the mixture in your tray which should be lined with waxed paper. I used tin foil. Remember to grease your lining with butter so it doesn't stick!
Place your tray in the fridge to cool, I left mine for 1 hour 30 minutes to be sure. Turn your fudge out of the tray and cut into pieces, it was quite crumbly so they won't be perfect squares but who cares as long as it tastes good! Place your fudge in airtight container(s) and you can store it for a week. I have put mine in the fridge to store as well but it doesn't say you need to do that.
Taste test - wow!!! The fudge melts in your mouth! It is very peanut buttery too, yum!! It is very moreish, I woke up this morning feeling a tad sick so have decided to kindly donate some to Mr M's work as Mr M can't have any due to it pretty much being sugar. I was thinking that this would be great to keep in the house for when we have visitors to see bump when he arrives, it doesn't take much effort to make and it saves on going out to buy biscuits!!
For the recipe you need icing sugar, butter, peanut butter (I went for smooth but it doesn't specify so up to you if you want crunchy fudge) and vanilla. I forgot the vanilla when I went to the shop, so made the fudge without it.
Measure out 225g butter - this is nearly a whole block, use what you have left to grease your tray. Next measure 200g peanut butter. Place the butter and peanut butter in a bowl and put in microwave on high for 2 minutes. Whilst this is melting measure 450g icing sugar. After the 2 minutes stir your butter/peanut butter mixture then put in microwave on high for another 2 minutes.
Add your peanut butter/butter mixture (and vanilla) to the icing sugar and stir well with a wooden spoon. Once it's stirred in (I had to get Mr M to help with that part as I'm a wimp and couldn't stir it well enough) place the mixture in your tray which should be lined with waxed paper. I used tin foil. Remember to grease your lining with butter so it doesn't stick!
Place your tray in the fridge to cool, I left mine for 1 hour 30 minutes to be sure. Turn your fudge out of the tray and cut into pieces, it was quite crumbly so they won't be perfect squares but who cares as long as it tastes good! Place your fudge in airtight container(s) and you can store it for a week. I have put mine in the fridge to store as well but it doesn't say you need to do that.
Taste test - wow!!! The fudge melts in your mouth! It is very peanut buttery too, yum!! It is very moreish, I woke up this morning feeling a tad sick so have decided to kindly donate some to Mr M's work as Mr M can't have any due to it pretty much being sugar. I was thinking that this would be great to keep in the house for when we have visitors to see bump when he arrives, it doesn't take much effort to make and it saves on going out to buy biscuits!!
Subscribe to:
Posts (Atom)